二:SSO 单点登入
欲速则不达
Why 单点登入?
一次登入,到处畅行!
前面我们讲了水平扩容多机部署时Session一致性的解决方案!在我们公司日常开发中一般不止一个应用如:商品 / 订单 / 客户 这些模块都要有登入!我们是不是可以讲登入做成模块形式来统一管理呢??
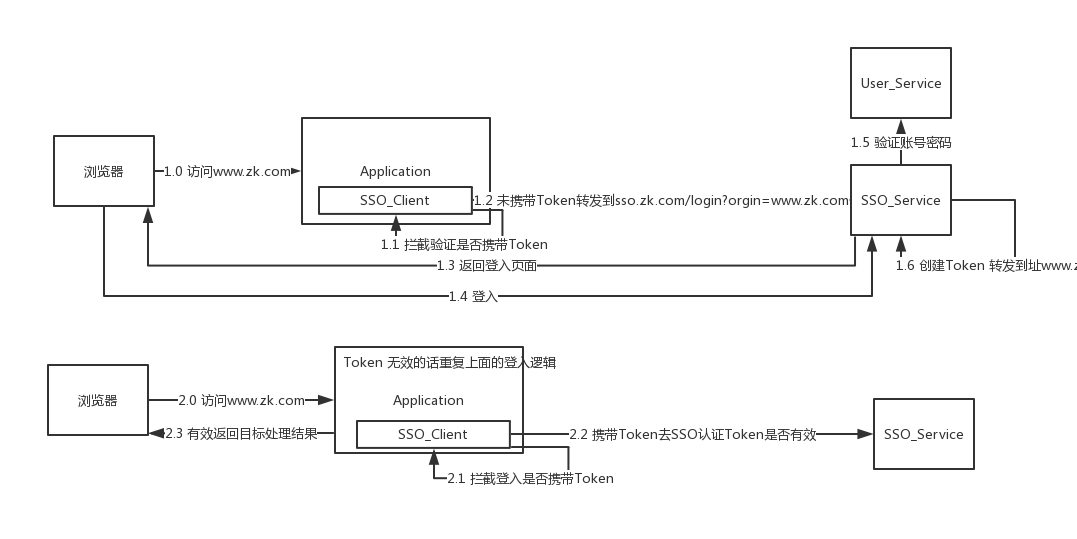
通过上图可知我们分为3大块
SSO-Client
SSO-Service
User-Service
SSO-Client
主要做登入拦截,这个是做成Jar包的方式集成进目标应用。
拦截方式
javax.servlet.Filter servlet 过滤器方式
org.springframework.web.servlet.HandlerInterceptor Spring拦截器方式
SSO-Service
主要用于登入,身份认证!一些常用信息存储等。
User-Service
需要登入的话必然我们就需要用户信息相关操作的!其实是作为一个单独作为一个依赖服务的。
Why 同域和跨域?
这是浏览器为了安全的一种保护行为!**跨域资源调度限制**。你可以试着考虑下,你先登入www.taobao.com,然后再登入 www.baidu.com。 难道你要把淘宝域名下的cookie发送给百度的服务器吗?

但是我们正常的开发中可能一个公司内部有多个系统多个域名,我们需要打通的各个系统的登入。这时候我们就面临新的挑战了! **跨域**
同源策略:
协议 | 域名 | 端口 都要相同,不然就会产生跨域问题
| URL | 说明 | 是否跨域 |
|---|---|---|
| http://www.taobao.com/item http://www.taobao.com/user | 相同协议,域名,端口 | 否 |
| http://www.taobao.com/item/app.js http://www.taobao.com/user/defult.js | 相同协议,域名,端口 不同资源 | 否 |
| http://www.zk.com:8080 http://www.zk.com:8083 | 相同协议,域名 不同端口 | 是 |
| http://www.zk.com:8080 https://www.zk.com:8080 | 相同域名,端口 不同协议 | 是 |
| http://127.0.0.1:8080 http://www.zk.com:8080 | 如果该域名指向的就是该IP 也是跨域了 | 是 |
| http://www.zk.com:8080 http://user.zk.com:8080 | 主域和子域 | 是 |
| http://www.baidu.com http://www.taobao.com | 不同域名 | 是 |
跨域解决方案:
JSONP: 这个方案只支持GET请求,遇到携带信息量较大的话会带来一些性能问题。暂时我没有详细研究,大家感兴趣可以自行研究。优点是支持比较老得浏览器!
CORS: 全称 跨域资源共享 注意:这个需要浏览器和服务器同时支持。除了一些微软系列比较老得浏览器,现在市面谷歌,火狐,猎豹啊的都支持的。莫名打了广告哈哈😅。
… 其他方案网上给出来的总共8种吧,应用我觉得主要就是以上两种。
好滴,接下来我们来讲讲 CORS !
两种请求:
浏览器会将CORS请求分为:**简单请求**(simple request) 和 **非简单请求**(not-so-simple request)
简单请求: 需要满足两大条件
请求方法:三种之一就好!
HEAD
GET
POST
请求字段:不超出以下几种字段。
Accpet : 代表发送端希望接收的数据类型(媒体类型资源)
Accpet-Language:代表客户端希望接收的语言类型
Content-Language:代表发送端的语言类型
Last-Event-ID:
Content-Type: 代表发送端的数据类型(媒体类型资源),只限三个值!
application/x-www-form-urlencoded
multipart/form-data
text/plain
非简单请求: 会在正式请求之前增加一个预检查请求(options 类型)注意需要配置文件web.xml开启这个请求类型!收到请求后才会执行真正的操作。
上硬菜 代码: springBoot项目
1 | /** |
估计你们肯定会想就这么简单吗? 我想说是的。还是扩展性更强的写法。
配置详解:
Access-Control-Allow-Origin 必填: 必填 授权访问资源 * 表示所有资源可以访问。你也可以填写一个具体的域名
Access-Control-Allow-Methods 必填: 允许跨域的方法 如POST, GET …
Access-Control-Max-Age: 预授权(非简单请求的预检查)的有效期,有效期内不用在发送一条检查请求。
Access-Control-Expose-Headers: 额外允许访问的响应头 CORS请求时,XMLHttpRequest对象的getResponseHeader()方法只能拿到6个基本字段:Cache-Control、Content-Language、Content-Type、Expires、Last-Modified、Pragma。如果想拿到其他字段,就必须在Access-Control-Expose-Headers里面指定。
Access-Control-Allow-Credentials: 是否允许携带cookie ,默认不携带,我们在Cookie存储Token肯定是需要的!
我肯定写的比较分散 有点像矮大紧想到哪里,就讲到哪里呢! 大家不要在意这些细节,我收回来。
代码实现SSO!
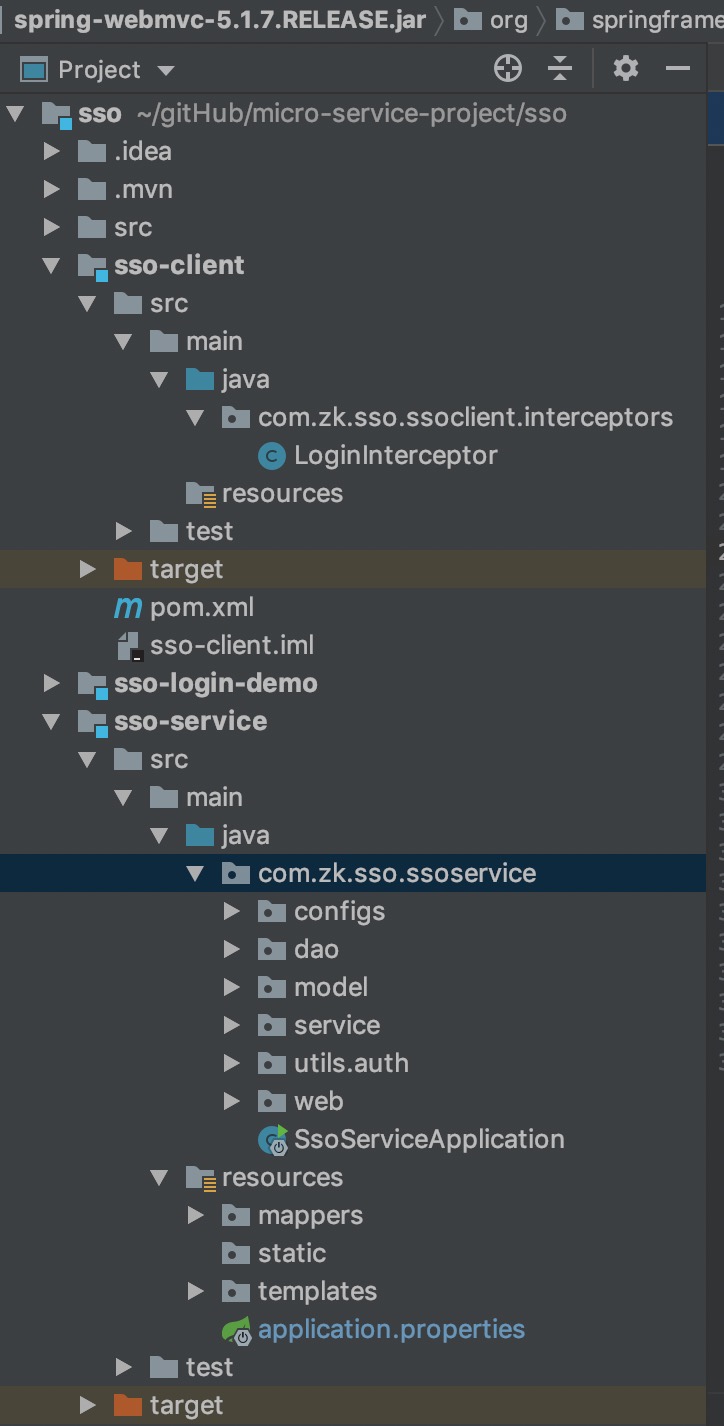
SSO-Client: 代码
新建Spring-Boot 工程!名字sso, 创建子模块sso-client
pom.xml
1
2
3
4
5
6
7
8
9
10
11
12
<dependencies>
<dependency>
          <groupId>org.springframework.boot</groupId>
          <artifactId>spring-boot-starter-web</artifactId>
</dependency>
<!-- http客户端 -->
<dependency>
<groupId>org.apache.httpcomponents</groupId>
<artifactId>httpclient</artifactId>
<version>4.5.9</version>
</dependency>
</dependencies>新建拦截器 我这里选用的Interceptor方式
1 | /** |
SSO-Service 代码:
sso 下面新建子工程 sso-servie
编写jwt 工具类上篇文章已经介绍过了这里就不多讲
pom.xml
1 | <dependency> |
4.编写 登入类
1 | /** |
- 认证类
1 | /** |
小叙:
这个是一个比较简单的实现很多地方都不不是特别验证,比如跨域携带, jwtToken实时刷新等等问题,都没有解决 这个这是打个样,我们什么都是从简单到深入,踩很多坑和雷的。接下的文章会更加深入探讨这些问题的。